In this guide:
- How to make an image into a clickable link using Webflow (no-code required)
- Step-by-step solutions for the Webflow CMS, Webflow Designer, and Rich Text Element + CMS - How to make an image clickable with embedded custom code
- Plus making this embedded custom code editable via the Webflow CMS
The Problem
When you add an image to Webflow via the Designer, or CMS, you'll quickly find out that there is no way to simply add a link to your image to make it clickable. Luckily, making an image a clickable button/link is absolutely possible in Webflow with no custom code required and if you're handling the Designer for someone that only uses the Webflow CMS, there is an easy way to let them control the image and link.
For those of you that need to use a solution other than Webflow's Image element, we will also be covering how to make an image clickable when it's in an embedded piece of custom code and how to make this solution accessible by the Webflow CMS. You may find this useful if you're integrating with a third-party service, or API of some sort.
The Solution
To make an image a link in Webflow, you cannot simply add a link location to an Image element. Instead, we will need to use a Link Block element with an Image element inside. This makes it so that when someone goes to click on an Image, they're actually clicking on the Link Block element instead. By using a Link Block element, we're able to use various types of links (ie phone number, link to a web page) while helping maintain accessibility, as screen readers should be able to detect a Link Block as clickable much easier than hacking together a solution on the Image element itself. This method works with both the Webflow Designer and Webflow CMS with the addition of some controls.
Alternative Solutions
- If you are unable to use the Link Block and Image elements that Webflow provides, we'll be covering some solutions for custom code in Method 3 and Method 4 below.
- If you are looking to make an image that you've uploaded via a Rich Text Element in the Webflow CMS, you can do so by following Method 5 below.
Step-by-Step: How to Make an Image a Link/Clickable Button in Webflow
Method 1: In the Webflow Designer
Use these instructions to make an image into a link while in the Webflow Designer. This process does not connect the image link in any way to the Webflow CMS, so it must be modified in the Webflow Designer in the future.
Step 1 - Add the Link Block element
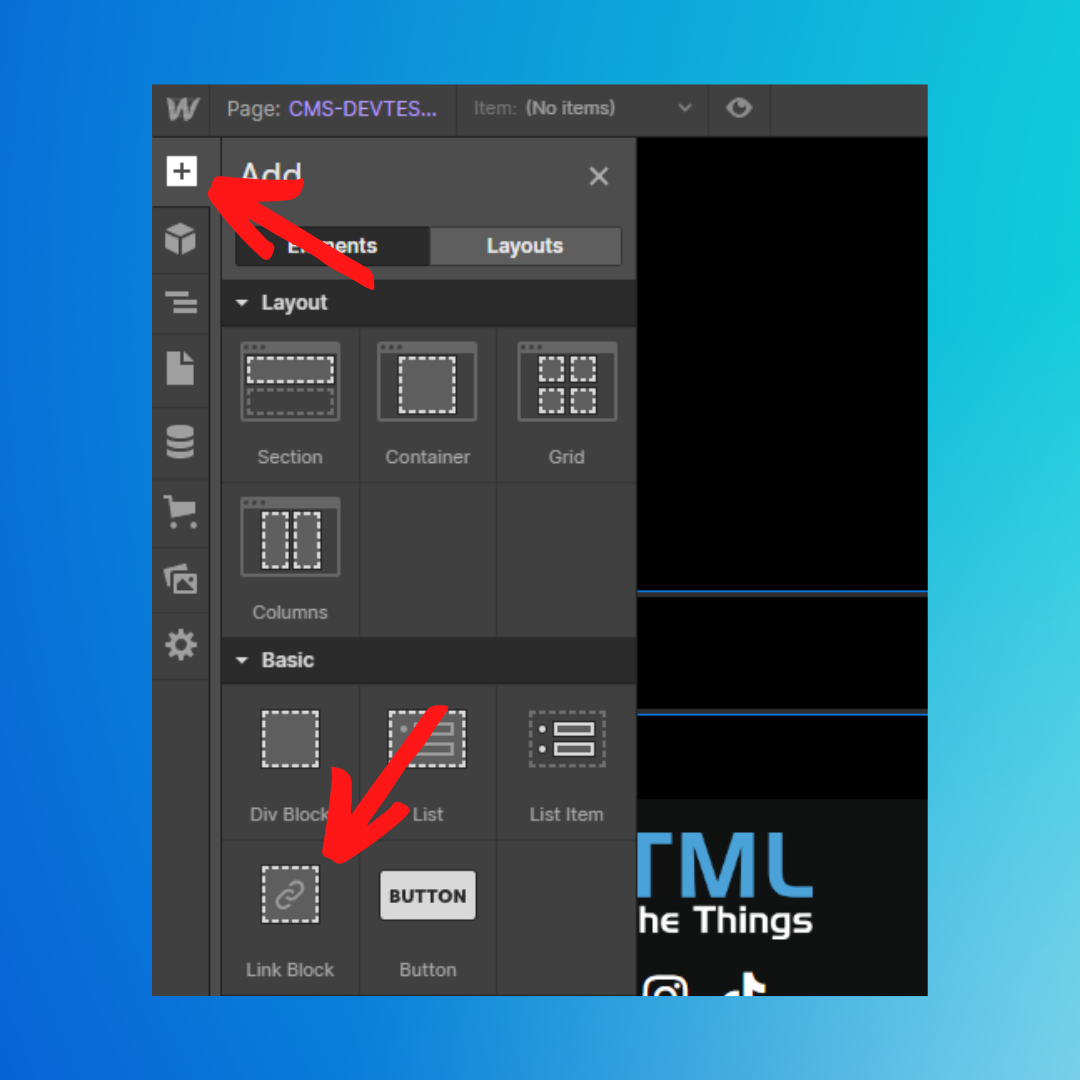
- Click on the "+" icon in the top left of the Designer to open the "Add" menu on the left-hand side
- In the "Add" menu, click-and-drag the Link Block icon into your page
Step 2 - Setup your Link
- You should see a small window named "Link Settings" next to the Link Block you just dropped onto the page
- If you don't see the "Link settings" window, click on the Link Block, and then click on the small cog icon - Setup your link to work the way you want. There are several options at your disposal here, we'll go through the options briefly in case you're not familiar with them.

- Link Settings (link type) buttons left-to-right
- URL - used for linking to specific web addresses
- Page - link to pages within your Webflow site
- Section - link to a section on the page where the link is located (scrolls so that the linked section is in view)
- Email - sets up an email in the user's email client when clicked
- Phone - makes a phone call when clicked, functionality varies by device
- Attachment - links to an uploaded file (ie an image)
- Once you've selected your link type, fill in the information to get the link working (ie URL, phone number, etc.)
Step 3 - Add your Image element
- Click on the "+" icon in the top left of the Designer to open the "Add" menu
- From the "Add" menu, click-and-drag the Image element into the Link Block that you just configured
- You should see a small window named "Image Settings" (similar to the "Link Settings" window you've already worked with) next to the Image element you just dropped on to the page
- If you don't see the "Image Settings" window, click on the Image element, and then click on the small cog icon

Step 4 - Setup your Image
- From the "Image Settings" window, set up the image you want to use, and adjust any settings you may need to. If you're not familiar with these settings, I've included a brief description of them below, more information can be found in the Webflow documentation
- If you're not familiar with the options in the "Image Settings" window, here's a brief description of them from top-to-bottom
- Choose Image - select the image you want to use from your uploaded media (Assets)
- Image is HiDPI - select if the image is high DPI (more info on the Webflow forums)
- Width - leave on auto, or set a specific width in pixels (px)
- Height - leave on auto, or set a specific height in pixels (px)
- Alt Text - set your desired alt text (description for screen readers)
- Load - how the image loads on the page, used to fine tune page performance

Step 5 - You're Done, Time to Publish!
- Once you're done setting up your Link Block and Image elements, you're ready to publish your project!
- Don't forget to test!
- I recommend testing with a mouse and touch screen
Method 2: In the Webflow CMS
For collaborators on your website, or people that would prefer to only use the CMS, we can add controls that allow them to upload/replace images and control where those images link to.
Please Note: This method only works on CMS Collection pages. You cannot edit the link location of Link Block elements within the Webflow Editor (source).
Step 1 - Setup your CMS
- Click on the CMS button on the left-side of the screen
- The "CMS Collections" menu should open, hover your cursor over the CMS Collection you want to have your clickable image added to and click on the cog icon that appears
- Once open we're going to add two fields
- Click on the "Add New Field" button and select the "Image" option, name it something descriptive (I've called it 'Clickable Image'). Once you're done, save your new Image Field
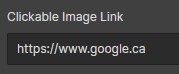
- Click on the "Add New Field" button again and select the "Link" option, also name it something descriptive (I've called it 'Clickable Image Link'). Once you're done, save your new Link field - Once all your fields are added, click on "Save Collection" in the top-right

Step 2 - Add the Link Block element
- Click on the "+" icon in the top left of the Designer to open the "Add" menu on the left-hand side
- In the "Add" menu, click-and-drag the Link Block icon into your page
Step 3 - Connect the CMS to the Link Block element
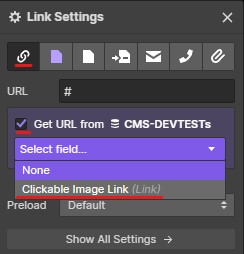
- Ensure your Link Block is selected and then click on the cog icon in the top-right of the element, the Link Settings popup window should appear
- In the Link Settings popup window, ensure the left-most button is selected
- Click on the checkbox labelled "Get URL from <YOUR CMS NAME>" and a dropdown menu should appear
- Click on the dropdown menu and select the link you want the image to link to, in this case we're selecting the "Clickable Image Link" field
Step 4 - Add the Image element
- Click on the "+" icon in the top left of the Designer to open the "Add" menu
- From the "Add" menu, click-and-drag the Image element into the Link Block that you just configured
- You should see a small window named "Image Settings" (similar to the "Link Settings" window you've already worked with) next to the Image element you just dropped on to the page
- If you don't see the "Image Settings" window, click on the Image element, and then click on the small cog icon
Step 5 - Connect the CMS to the Image element
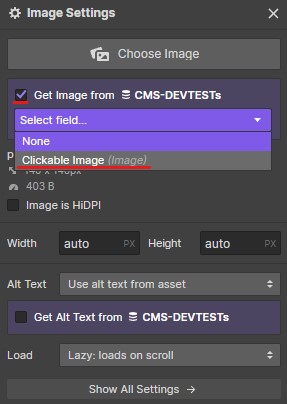
- In the "Image Settings" popup, click on the checkbox labelled "Get image from <YOUR CMS NAME>" and a dropdown menu should appear
- Click on the dropdown menu and select the link you want the image to link to, in this case we're selecting the "Clickable Image" field
- Note: For this tutorial we won't be adding any alt text, but I do recommend you ensure your images have alt text whenever possible
Step 6 - You're Done, Time to Publish!
- Now that you're done the setup, all you need to do is publish your website and your CMS should be ready for your Collaborators.
- Remember to test out your changes!
Method 3: Custom Code + Designer
Step 1: Add the Embed Element
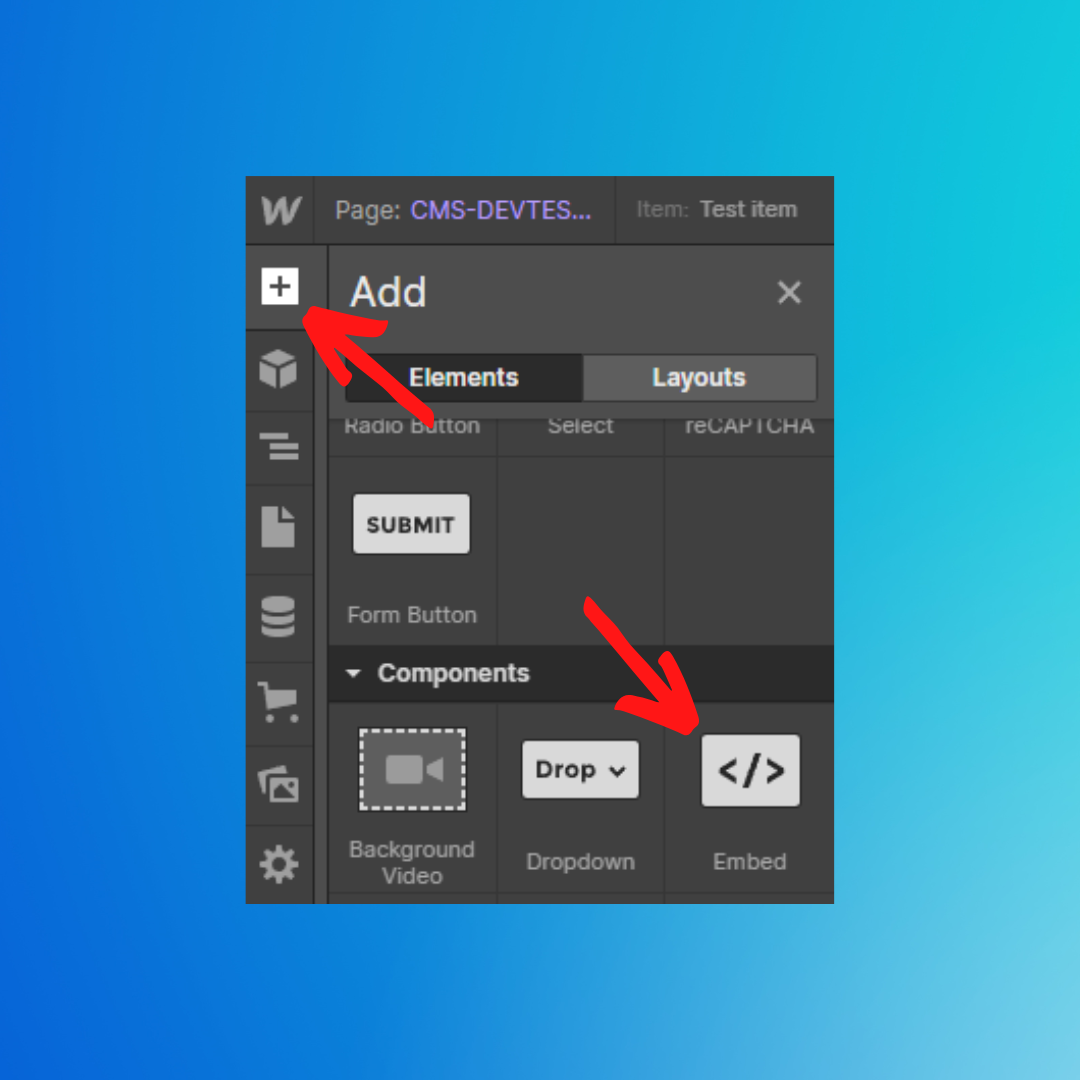
- Click on the "+" icon in the top left of the Designer to open the "Add" menu on the left-hand side
- In the "Add" menu, click-and-drag the Embed icon onto your page
Step 2: Add Your Custom Code
- The HTML Embed Code Editor should have automatically opened
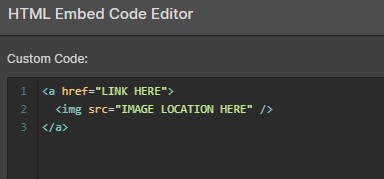
- If it didn't, double-click on the Embed element you just dragged onto the page - We're going to add our custom code to the HTML Embed Code Editor
- For the purposes of this tutorial I will just be using some basic HTML, chances are if you're in need of Custom Code, you'll need to put some more advanced code here for your specific purpose
- An example of my basic HTML can be found below
Step 3: Save Your Code
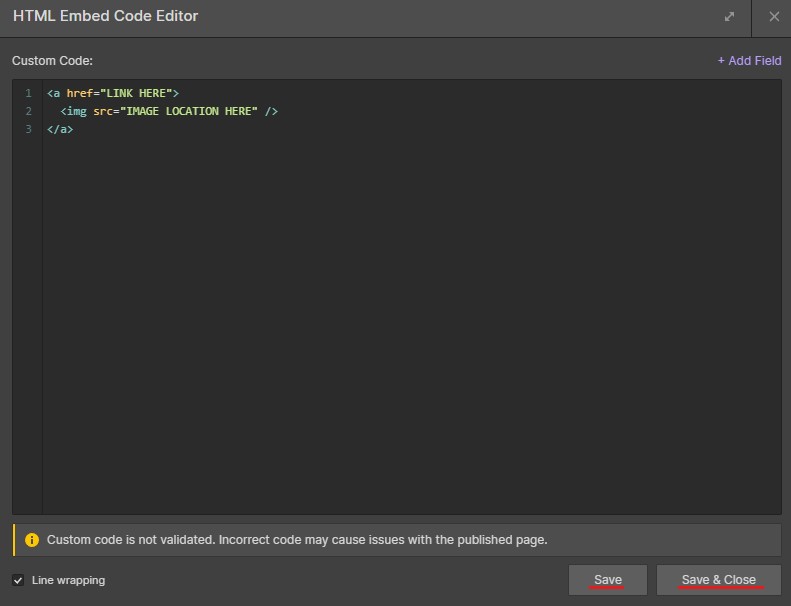
- Ensure you save your custom code by using the "Save" and "Save & Close" buttons at the bottom right of the HTML Embed Code Editor
- Use "Save" often if you're working on your code for a while, it will save your progress without closing the editor
- Use "Save & Close" if you're done working on your code and want to test it out
Step 4: You're Done, Time to Publish!
- Now that your custom code is completed, it's time to publish your site
- Make sure you test it out after the publish is complete!
Method 4: Custom Code + CMS
Please Note: This method only works on CMS Collection pages. You cannot edit the link location of Link Block elements within the Webflow Editor (source).
Step 1: Add the Embed Element & Custom Code
- Follow Step 1 and Step 2 from Method 3 above to get your Embed Element added to your page and your Custom Code added
Step 2: Give the CMS Control
- The premise here is that you want to allow the CMS to edit certain elements of your code, namely the path/link to the image and where the link goes. To do this you can add the CMS fields into select areas in your HTML Embed Code Editor. Depending on your code, the placement of your CMS fields may vary. You may also need more, or less fields from the CMS
- For this tutorial (see below), I'm simply using my example code from Method 3, Step 3 and using the Image and Link fields from Method 2, Step 1
- Instead of me specifying a location in my link's href property, I'm using the link that will be provided by the CMS
- Similarly, instead of specifying where my image asset is located in my img tag's src property, I'm using the link/asset that will be provided by the CMS - Place your cursor where you want the CMS field to go and then click on "+ Add Field"
- A dropdown menu should open with all your compatible CMS fields, select the one you need to see it populate into your code, indicated by a purple background and white text
- Repeat this step as needed for additional fields

Step 3: Save Your Code
- Ensure you save your custom code by using the "Save" and "Save & Close" buttons at the bottom right of the HTML Embed Code Editor
- Use "Save" often if you're working on your code for a while, it will save your progress without closing the editor
- Use "Save & Close" if you're done working on your code and want to test it out
Step 4: You're Done, Time to Publish!
- Now that your custom code is completed, it's time to publish your site
- Make sure you test it out after the publish is complete!
Method 5: Rich Text Element + CMS
From the CMS, if you're trying to make an image that you've uploaded/embedded with a Rich Text Element clickable, you can do so with just a few clicks.
Step 1: Add an Image to the Rich Text Element
- With your cursor in the Rich Text Element, start a new line where you'd like to put your image
- A small "+" sign should appear on the new line, click on it to make a small menu appear
- From the small menu, click on the image icon (icon on the far left)
- A window should appear for you to select an image from your computer
- Once selected the image should upload and appear in the Rich Text Element

Step 2: Add Your Link to the Image
- Click on the image that you've uploaded to make a small menu appear above it
- In that menu, click on the wrench icon, which will make another menu appear
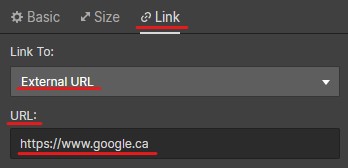
- At the top of that menu, click on the "Link" tab
- In the Link tab, click on the dropdown menu and select "External URL" to make a "URL" field appear
- Fill in the "URL" field with your desired link
Step 3: You're Done, Time to Publish!
- Now that your link is attached to your image, it's time to publish your site (or at least the edited post)
- Make sure you test it out after the publish is complete!
Common Issues & Solutions
Issue 1: Image Is Not Clickable
If you've followed one of the methods above and your image's link is not working, there are two common reasons:
Situation 1: Link Block Does Not Wrap Around the Image
- Your Image element may not be inside the Link Block element
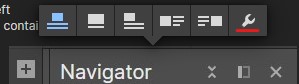
- To check if this is the problem, check the Navigator via the button in the top-left
- The images below will show you what to look for, the Image element should be contained by the Link Block element

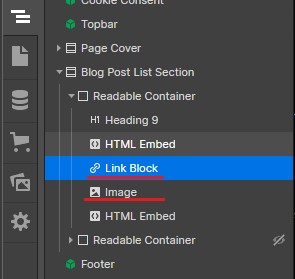
- If your Navigator looks like the second "It should not look like this" image, you can correct this by clicking and dragging the Image into the Link Block in the Navigator
Situation 2: CMS Field Not Filled Properly
- If you're in the CMS, ensure that the appropriate field is filled in properly and that the post (Collection Item) has been published. You can see an example of how I filled in a Link field below